


I recently posted a photo of the stars (on Facebook) that I took the other night in my backyard, so I thought I would create a short post about how I took that photo. It’s quite different taking a photo of the sky, especially the night sky, versus taking photos of people. The camera should be set in manual mode and you should ALWAYS use a tripod. If you do not use a tripod you cannot guarantee a sharp photo, especially of the night sky. Anyways, here is the equipment I used:
1. Canon 5D Mark II (you obviously don’t need this camera but I’m just listing the things I used specifically)
2. Tripod (special thanks to my lovely Grandpa for the tripod – he is also a photo lover like myself :))
3. 50mm f/1.4 lens

Here are the settings I used in my camera:
1. Manual mode – I use manual for everything, but in case you don’t you’ll want to set it to manual.
2. Manual focus – I set it JUST before infinity (it looks like an L and two o’s) because those stars are pretty far away.
3. Aperture set to f/2.0 – you’ll want to set it to a somewhat wide aperture – my lens can go to f/1.4 but I left it at f/2.0 – other people have taken photos at f/2.8 and it still works great.
4. Shutter speed set to 4 seconds – because my aperture was wide I could keep the shutter speed relatively fast. With a smaller aperture, I would have left the shutter speed between 20 and 30 seconds.
5. ISO set to 800 – I started way higher – 1600 – and then kept bringing it down until the brightness was pretty good.
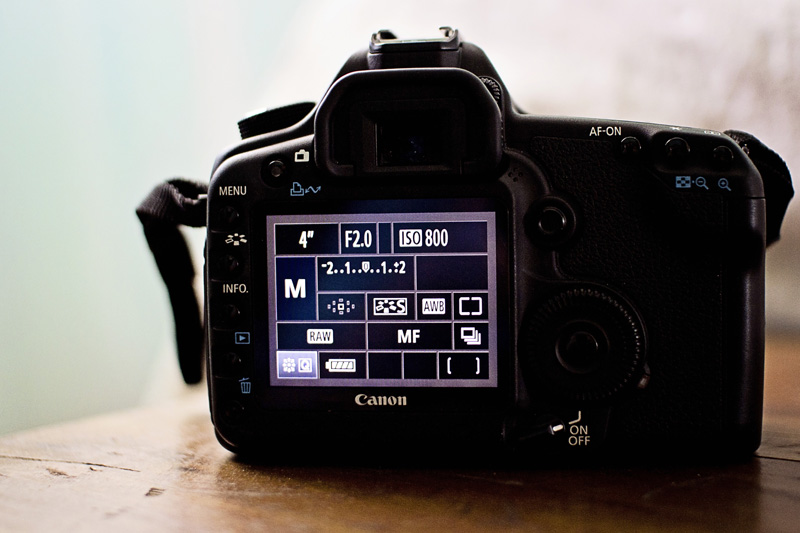
Here’s what the back of my camera looks like with these settings:

I set my tripod on the deck (make sure it’s steady) and attached the camera (obviously). I started with the ISO really high and the shutter speed really long (started with ISO at 1600 and the shutter speed at 30 seconds). I kept bringing both down, doing a little trial and error until I found a good setting (ISO at 800 and shutter speed at 4 seconds).
Here is what the photo looked like before I brought it into Adobe Camera Raw:

My post-processing was super easy and quick. I bumped up the contrast, enhanced the blacks, adjusted the temperature a tad so the pretty royal blue showed a little (the sky was royal blue in person but didn’t show in the camera), and then sharpened it. Here is the finished result:

The moon was super bright and actually left a “moon glare” at the bottom of the photo. Had the moon been absent that night or less bright, I’m sure I would have been able to capture more stars. Perhaps I shall give it another try when the moon goes away. In the mean time, my next goal is to capture the Milky Way… 🙂
I hope this was helpful to those who are interested in shooting for the stars… 🙂 Happy Friday!

